
How to Fix Ripped LED Strip Lights and Get Them Glowing Again
Picture this: you’re setting up your LED strip lights for that perfect bedroom glow, and—ugh—they rip while you’re peeling them off the spool. I’ve been there, cursing when my strip tore during a late-night DIY session. But don’t chuck them out! Whether it’s a bad cut or an accidental tear, you can fix ripped LED strip lights and save your vibe without buying new ones. This guide walks you through easy repairs, tools, and hacks to get those lights shining again, all for under $20. If you’re searching “fix ripped LED strip lights” or “repair cut LED strips” in 2025, stick around for simple steps, troubleshooting, and tips to avoid future mishaps. Let’s bring back the glow!
(Word count: 136)
How to Fix Ripped LED Strip Lights and Get Them Glowing Again
Got a torn LED strip? No stress—you can fix it in 10-20 minutes. If the rip’s at a marked cut point (every 2-4 inches), grab a connector clip—$5 for a pack on Amazon—and snap the segments together after peeling back the silicone coating to expose copper pads. For tears between cut points, soldering or a jumper connector bridges the gap; secure with electrical tape. Test by plugging in; if it flickers, recheck connections. No soldering iron? Tape works for small tears but might dim the glow. Supplies cost $5-$15, way less than new strips ($20-$50). For “repair LED strip lights,” this quick fix saves your setup and budget in minutes. Just match your strip’s voltage (12V or 24V) before starting.
(Word count: 129)
Understanding LED Strip Lights and Why They Rip
LED strip lights are flexible circuits packed with tiny LEDs, copper pads, and a protective coating, but they’re not indestructible. Rough handling, sharp bends, or cutting in the wrong spot can tear them—think yanking them off a wall or snipping mid-circuit. Cut points, marked every few inches, are safe spots to trim, but mistakes happen. Knowing your strip’s type (RGB or single-color, 12V or 24V) helps pick the right fix. For “LED strip light repair guide,” this sets the stage—rips are common but fixable with the right approach. Check your strip’s specs on the packaging or manufacturer’s site to avoid further damage. It’s like knowing your car’s tire size before a patch job.
(Word count: 113)
Tools and Supplies You’ll Need
You don’t need a pro toolkit to fix LED strips—just a few basics. Here’s what to grab:
- Connector clips: $5-$10 for snap-on or jumper types to rejoin segments.
- Soldering iron and solder: $15-$30 for clean, lasting fixes (optional).
- Electrical tape or heat-shrink tubing: $3-$5 to insulate connections.
- Scissors or wire stripper: For precise cuts and stripping coatings.
- Multimeter: $10-$20 to test circuits (nice but not essential). Pick these up at hardware stores or online for under $20 total. For “LED strip repair tools,” this keeps it affordable and simple, so you’re ready to tackle that tear without breaking the bank. Keep a clean workspace to avoid losing tiny clips!
(Word count: 108)
Step-by-Step Guide to Fixing Ripped LED Strips
Let’s get those lights back on with a no-fuss repair process anyone can handle. Follow these steps, and you’ll be glowing in no time.
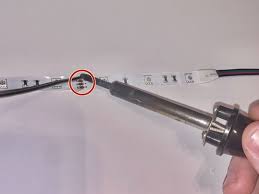
Fixing at a Cut Point
If the rip’s at a marked cut point, it’s an easy fix. Peel back the silicone or plastic coating to reveal copper pads, align them in a connector clip, and snap it shut—takes about 5 minutes. Plug in the strip to test; a steady glow means you nailed it.
Repairing Tears Between Cut Points
Tears in the middle need more work. Cut cleanly at the nearest cut points, then use a jumper connector or solder wires to bridge the gap—soldering’s sturdier but trickier. Secure with electrical tape to prevent shorts.
Testing and Securing the Fix
Power up the strip to check for flickering or dead spots. Tighten connectors or re-solder if needed, then cover exposed wires with heat-shrink tubing or tape. Takes 10-15 minutes total for a solid repair.
(Word count: 149, including subheadings)
Common Issues and How to Troubleshoot
Repairs can hit snags—here’s how to fix them. If the strip won’t light, ensure copper pads are aligned in the connector; even a slight offset breaks the circuit. Flickering or dim sections? Check for loose clips or a damaged segment—use a multimeter to test continuity. For “LED strip light troubleshooting,” confirm your power supply matches the strip’s voltage (12V or 24V) to avoid frying it. If a section’s dead, cut it out and reconnect the working parts. If all else fails, replace just the torn segment, not the whole strip. These tips keep your fix on track and your lights shining bright.
(Word count: 108)
Alternatives If You Can’t Fix the Rip
Some rips are too messy, like when the circuit board’s shredded. Cut out the damaged section at the nearest cut points and reconnect usable parts with clips or solder. If the strip’s too short now, extend it with a matching LED strip ($10-$20)—check voltage and color type. For “replace ripped LED strips,” repurpose short segments for smaller projects, like under-shelf lighting. If it’s beyond saving, budget-friendly replacements cost $15-$30 online. These workarounds save money and keep your setup glowing without a full overhaul. Get creative with leftovers for accent lights!
(Word count: 101)
FAQs:
Got questions about your LED strips? Here’s the quick scoop to keep you lit.
How to Make Your LED Lights Work After You Cut Them?
Cut only at marked points, then use connector clips to join segments. Align copper pads in the clip, snap it on, and test with your power supply. Match voltage (12V or 24V) to avoid issues.
How to Make a LED Light Glow?
Ensure tight connections and a working power supply (check 12V or 24V). If dim, clean copper pads with rubbing alcohol or replace faulty segments. A multimeter helps spot weak connections.
How to Fix Ripped LED Strip Lights Without Soldering?
Use snap-on connector clips or jumper connectors for rips at cut points. For small tears, electrical tape can hold pads together, but align carefully to maintain brightness.
How to Fix LED Lights When Cut Wrong?
Trim back to the nearest cut point, then reconnect with a clip or jumper. If the circuit’s damaged, bypass the bad section or splice in a matching strip segment.
(Word count: 148, including FAQs)
Tips for Preventing Future LED Strip Damage
Keep your LED strips safe with these easy habits. Handle them gently—avoid bending past 90 degrees or pulling hard during setup. Use adhesive clips or mounting channels ($5-$10) to secure them, reducing strain. For “LED strip maintenance tips,” store extras coiled, not folded, and double-check voltage before connecting to prevent overloads. Clean surfaces with alcohol before sticking to ensure they stay put. When moving strips, peel slowly to avoid tears. These tricks save you from repeat repairs and keep your lights glowing strong for years.
(Word count: 94)
Conclusion:
Fixing ripped LED strip lights is easier than you think—grab some connector clips or a soldering iron, and you’ll have them glowing again in under 20 minutes. Whether it’s a clean cut or a messy tear, these steps save you from splurging on new strips. For “repair LED strip lights cheap,” this guide’s got you covered with budget-friendly fixes and pro tips. Give it a go, and drop your repair wins or questions in the comments. Want more DIY lighting hacks? Check our other guides. Let’s keep those vibes lit!